Transforming Smiles, Restoring Confidence.
Dental Bridge Procedure: Step-by-Step Process, Benefits, and Real Success Story of Maria’s New Smile
Language :
Topics:
Dental Bridge: Step-by-Step Process, Benefits, and a Short Success Story (Maria)
What is a dental bridge?
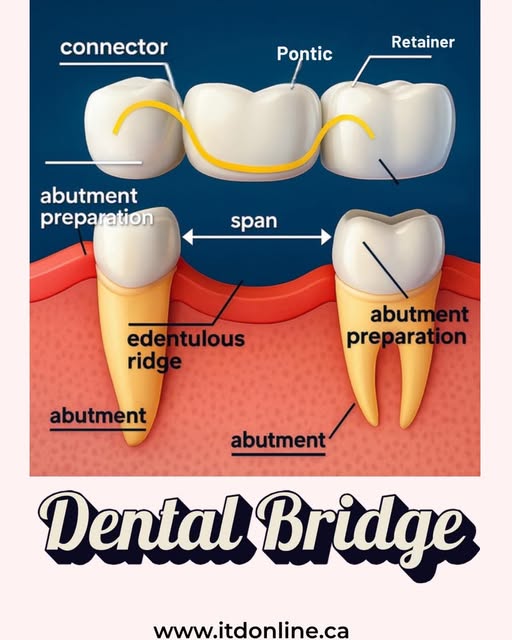
A dental bridge is a fixed prosthesis that replaces one or more missing teeth by anchoring an artificial tooth (pontic) to adjacent prepared teeth or dental implants (abutments). It restores function, appearance, and the proper alignment of your bite.
Step-by-Step — How a Dental Bridge Is Made and Placed
1. Initial consultation & treatment planning
Your dentist will:
-
Examine your mouth, teeth and gums; take dental X-rays (and possibly a CBCT if needed).
-
Determine whether a traditional bridge (supported by natural teeth) or an implant-supported bridge is best.
-
Discuss expectations, materials (porcelain fused to metal, all-ceramic, zirconia), costs and timeline.
-
Treat any gum disease or decay first so the foundation is healthy.
2. Tooth/abutment preparation
-
The teeth on each side of the gap (abutment teeth) are gently reshaped to make room for crowns that will hold the bridge.
-
If implants are chosen, implant surgery will be done first and allowed to heal (osseointegration) before the bridge stage.
3. Taking impressions & shade selection
-
The dentist takes a precise impression (digital scan or putty) of the prepared teeth and the gap.
-
The lab is given the shade and shape preferences so the bridge matches neighboring teeth.
4. Temporary bridge (if required)
-
A temporary bridge is placed to protect prepared teeth and maintain function and appearance while the permanent bridge is made.
5. Laboratory fabrication
-
The dental lab fabricates the bridge (framework + pontic + crowns) to the exact measurements, often using CAD/CAM technology for high accuracy.
-
Materials vary by strength and aesthetics; zirconia and all-ceramic options are highly aesthetic.
6. Try-in and adjustments
-
At the try-in appointment the dentist checks fit, bite (occlusion), contacts with adjacent teeth, and color.
-
Small adjustments are made — sometimes the lab will make final changes.
7. Final cementation or attachment
-
Once fit and aesthetics are confirmed, the bridge is permanently cemented onto the prepared abutment crowns, or secured to implant abutments.
-
The dentist checks bite one last time and polishes the restoration.
8. Aftercare & follow-ups
-
Instructions: gentle chewing for a short period, maintain excellent oral hygiene (flossing under the pontic with special threaders or water flossers), use fluoride toothpaste if recommended.
-
Regular dental checkups to monitor the bridge, abutment teeth, and gum health.
The Great and Wonderful Benefits of a Dental Bridge
-
Restores chewing and speaking — missing teeth make biting and clear speech harder; a bridge returns function.
-
Improves appearance — fills the gap for a natural, confident smile.
-
Prevents shifting of adjacent teeth — keeps neighboring teeth from tilting or drifting into the empty space.
-
Maintains facial shape — supports lips and cheeks to prevent a “sunken” look.
-
Fast and predictable — compared with some alternatives, a traditional bridge can be completed relatively quickly.
-
Durable — with proper care, bridges often last many years; high-quality materials improve longevity.
-
Smoother recovery than some surgeries — for patients who are not candidates or prefer to avoid implants, bridges are a reliable option.
Important note: to protect the bridge you must keep the supporting abutment teeth and gums healthy — good hygiene and regular dental visits are essential.
Short Success Story — Maria’s Bridge
Maria had been hiding her smile for years after losing a molar from an accident. She found it hard to chew on that side and started avoiding crunchy foods. At her consultation, the dentist explained options and recommended a 3-unit bridge because her neighboring teeth were strong and healthy.
Procedure highlights:
-
Maria had her abutment teeth gently prepared and a temporary bridge placed the same day, so she never left with a gap.
-
After a week of comfort with the temporary, the permanent porcelain bridge was tried in and adjusted to match her natural teeth.
-
Final cementation took one appointment. Maria left the clinic smiling — her bite felt even and she could chew again without discomfort.
Two months later she said: “I can eat apples and bite into sandwiches again — and I don’t hide when I laugh. The whole process was easier than I expected, and my dentist showed me how to clean under the bridge.”
Aftercare Tips (quick checklist)
-
Brush twice daily and floss under the pontic with a floss threader or use an interdental cleaner.
-
Visit your dentist every 6 months (or as recommended).
-
Avoid very sticky foods that may dislodge temporary bridges.
-
If the bridge feels loose or you have pain, call your dentist right away.
Looking for dentist : Visit directory list
Teeth Case
 |
 |
 |
 |
 |
 |